
How to export data from Edval 10
As covered in our Enrolment Portal guide, the most efficient way to get your classes and students enrolled onto Education Perfect is by uploading a file that contains data from your export to our new Enrolment Portal. Check out our handy templates within the portal that can be utilised, alternatively you can find specific formatting options for the export from Edval to be used with our Enrolment Portal.
If you are using Edval 9, please see our article
here.
Within Edval 10, you're able to configure an export that contains all required data to be used with Education Perfect. This file contains:
- Student details (name and email address)
- Teacher details (name and email address)
- Classes and associated details (Subject and Year Level)
- Class Memberships
Configuring and exporting from Edval 10
- Open Edval and navigate to File > Synchronise > Configure.
- Go to the Sync tab
- Click on the '+' sign
- From the drop down list select 'Custom Export'
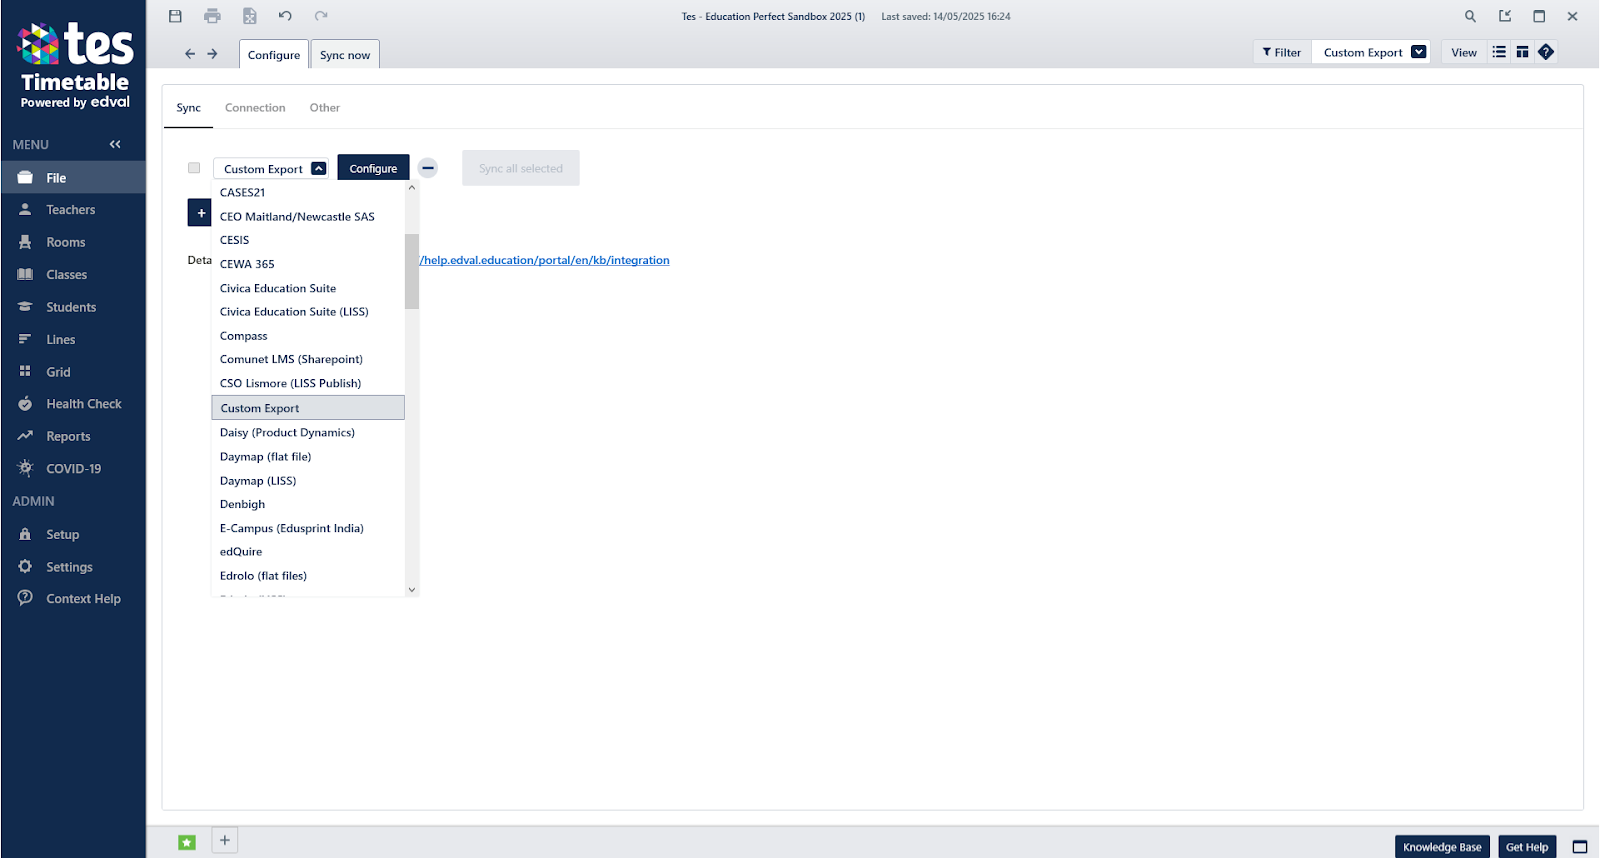
- Click on the Configure button (which will take you to the Connection tab).
- In the Connection tab, choose the location that the CSV file(s) will export to.
- The option to 'Sync (export) each time we save' can be left unchecked.
- Go to the Other tab
- Click on the Import templates button in the top right hand corner

- Paste in the code contained within the dropdown just below this and hit ‘Ok’
UeY6AIlLIJGvvJfQ1IUFq8CKnX/1UC0cUu83o3qXCRXXDwey5vPGNZVzDBaZcE3OH1DYyjtsANfoOqVBwRQbxvoGH5cD7yE3as3fkCHrcp7heXmvETbP9adHjkgDhhLNJvhzC/Drq5D8nOn1rhYC+zol3GIBE5ioxBbvG+MKinMipZoRvfPvpSyzNMMQ0s6nDqT8PAmIYcrBbHDiSKjXVFRJVkroaW5AJuZN73SkSRbXGq+Lh/z2qUyewvs18K5WBUm1o38tjdRfF5odHTFxcCBwgnX6ROkUoqtLuqA78GocCHCFHi0TlDFWj5Ya0OoyOgsREU0vPNR6F3Lr+Co3DTy0Bigu67535WEOsO4KziWwq9MBjiT+MQtI6LRgeI2vgNAHiR0mySDA1UO5rflJ9v7WbppDx2+Yp0eOSAOGEs35DlZn6brat6UDwlb457CVzpLiFuVCvZAbJACHFUeLAAvoqqu2l+O7s8vCKpuplSvJht7VLd+vc/jfwS1jv8WR4iZ1I/PZP5WtEd7FyVFSAYlSlA3qi4HhHZ6dglJdaExAet48Y0TAWF7Fvc4QJDUEv7S0bE+JPrs69JvohQ8fT7tqnWXOeuuZxLOy4Fg5dd2RXLjD7TQs+fhcF0Y6Wty7ioXxDeDzOxRjGympbMiCX+8VxqjdVlRtHBo8UPX7EU6H9gl7lrUQLf2dI1W6McGqWzHue9sfsq/F88uqVPloGFzfkyVEA/YR2FKY03dcgSlc5D8nLiYP/wSZG3Ukt3YyJI7AZKu61UGINki+Hhw3yXxkzdreBGsT/vFI2uRZsL+zy8Iqm6mVK8mG3tUt369z/FGUmtlCSXCWrQ7N6TfLLgk1WNoP1o+VOGNIrqXBgmFMnsL7NfCuVndXcDT0CApzeCp0AKJeuzyN2BqnnFT/Qx+BuQ2EjRAkosqdkZyx9YAkjsBkq7rVQTPJ2B51pwIuOgM+SWDSw3cxaSOZSnb4dodg6FfdsyjoTvbv5exeasumEkc3iTgl9EUOjREmhgDUjHzHf1XlpcMNX9TP1e4zvYMAIyo9aCBsw2B3xdu9lBpHcwnMbcJX2IqF8Q3g8zsUYxspqWzIgl/vFcao3VZUbRwaPFD1+xFOxR5HnyJMrMlSoc883JxWSMhZXLgx9hI49UvMvYrQG32t7ygJ3HzcBIyvaiVQq6Kl46m3a4I5Oeso5FWHCvO4K43YGqecVP9DdcMROhA1jLbxCI9+kY+o/h2enYJSXWhMw0bFxKT2uvQoCvCUdXeyE/0J2A4htoJe1qzxpuz1vl1/Z/4RXIOnyadHjkgDhhLN+Q5WZ+m62relA8JW+OewlXHmgA4Hv6Ad9J2wxlj+IV3wYoR9KIKJocTkAEtNJjqQft7MAxoQGoOtrZO4yzOYeQ5MVKgsseEqp0eOSAOGEs35DlZn6brat6UDwlb457CVceaADge/oB0xIzZoupb8zbPLwiqbqZUryYbe1S3fr3NJ9s9RAeX+I+ImdSPz2T+VrRHexclRUgGJUpQN6ouB4R2enYJSXWhMQHrePGNEwFhexb3OECQ1BL+0tGxPiT67OvSb6IUPH0+7ap1lznrrmcSzsuBYOXXdkVy4w+00LPn4XBdGOlrcu4qF8Q3g8zsUYxspqWzIgl/vFcao3VZUbRwaPFD1+xFOh/YJe5a1EC39nSNVujHBqlsx7nvbH7KvxfPLqlT5aBhc35MlRAP2EZk0cCZ66H9cioXxDeDzOxRjGympbMiCX+8VxqjdVlRtHBo8UPX7EU6SYxrimlc5z/fHfpmx9S2WioXxDeDzOxRjGympbMiCX+8VxqjdVlRtHBo8UPX7EU7RQiaQzJ36YN4myf0bIrNbegnvubqKgNmzLk1Mo1XtxbiE6i89i+5alq0Ozek3yy4JNVjaD9aPlThjSK6lwYJhTJ7C+zXwrlZ3V3A09AgKc3gqdACiXrs8jdgap5xU/0MfgbkNhI0QJKLKnZGcsfWAJI7AZKu61UEzydgedacCLjoDPklg0sN3MWkjmUp2+HaHYOhX3bMo6E727+XsXmrLphJHN4k4JfRFDo0RJoYA1Ix8x39V5aXDDV/Uz9XuM72DACMqPWggbBtzc7LQvFBOA0SWTCngV6kxaSOZSnb4dodg6FfdsyjoTvbv5exeasueRNEYQhdJXS0s/bYSYK8kk7aJYOHQ0Bf4XBdGOlrcuwp/Td0RLRpgnQ/tRAkxDiNFoP/RzWMc+KCL6iK6euJD6xL21ZJrHNmWBqeuv2SIRdO4jSv42faWUaMUJ3E3SYIYczwFiFcYe4Mxldf6rzkKg2q6vrRtQwwE0oXdpNt5U8TxhaGjZleB7pyA/MZkjp9fF5odHTFxcHA1+sqG9EdMu19svZkG95YZ56Pc6A8dMOEUTJhO2AECMVaPlhrQ6jJiV7SSZ25ZlASZG3Ukt3YyJI7AZKu61UGINki+Hhw3yTp2BhNhoslXG1JukOFMqAzvFcao3VZUbVZe4G1jDLLeljzTpZL4OQqaf0BQk0jFRFzkPycuJg//BJkbdSS3djIkjsBkq7rVQYg2SL4eHDfJSURmjQF4k61KKT1wrD0BXnoJ77m6ioDZTE7l1Ee0Gv7tcZmzNtLOCAOUKlTDGjLslq0Ozek3yy4JNVjaD9aPlThjSK6lwYJhTJ7C+zXwrlZ3V3A09AgKc3gqdACiXrs8jdgap5xU/0MfgbkNhI0QJKLKnZGcsfWAJI7AZKu61UEzydgedacCLjoDPklg0sN3MWkjmUp2+HaHYOhX3bMo6E727+XsXmrLphJHN4k4JfRFDo0RJoYA1Ix8x39V5aXDDV/Uz9XuM72DACMqPWggbBtzc7LQvFBOA0SWTCngV6kxaSOZSnb4dodg6FfdsyjoTvbv5exeasueRNEYQhdJXZWpEooDG9yPxeS6zqm7ouSTtolg4dDQF/hcF0Y6Wty7Cn9N3REtGmCdD+1ECTEOIySSO78nbwJ5xskFhX18TUKk9rfj2aanashZXLgx9hI41Qw4uW4FJcNAirzfeG0Fjg7/3qwWCPrjUn7jnNPv2d8/ObCgWo3dB/jJyXcQWnUufZBdvuwxkVvVtSCMi67SPiUdX0khSTMQVElWSuhpbkB1P6oHprisRATShd2k23lT7xXGqN1WVG1oGho/mpw+dmJ9vY6YfY5cOlc6gGMFb0Oiq1lexobJL0AJf8+vYxIB/Nm7c+yPLy/5Zsl/Xo3sIQOwxkyEnqRcFYDVhSLnfB0Winuhj163UlkAFQklBFK22/1TH1QO4aU6VzqAYwVvQ6KrWV7GhskvQAl/z69jEgFARhAo2vq+P/92FzOaa0ER5diaQ1vDEKF/xvaUF6RnMDnf/XZsCWZhIHCCdfpE6RR6e/u/16GyG/B0pMr24tPuQcpgrIrxXyvAUB7HPy60ZbH3EkoYk2jAi2zT9IWpnEGqVhSTgIRa2CyzNMMQ0s6nDqT8PAmIYcrBbHDiSKjXVFRJVkroaW5AJuZN73SkSRbXGq+Lh/z2qUyewvs18K5WBUm1o38tjdRfF5odHTFxcCBwgnX6ROkUoqtLuqA78GocCHCFHi0TlDFWj5Ya0OoyOgsREU0vPNR6F3Lr+Co3DTy0Bigu67535WEOsO4KziWwq9MBjiT+MQtI6LRgeI2vgNAHiR0mySDwFVjXgEXws+gvwAK1iX+BMVaPlhrQ6jI6CxERTS881HoXcuv4KjcNY8k08H52VHeTHozwJ9t1Lm9+CmKuPT4BXOQ/Jy4mD/8EmRt1JLd2MiSOwGSrutVBiDZIvh4cN8kv7mjwg7vW8JQPA06nkIj1PF3TKfnqG9UQSx7ZHAlVAUmTkGzhO48oFzBMvmQbmbJS8KciVae++w==
- Click the Sync now tab and select Export Files
- Your exported file should be accessible from the location you set in step 6
Formatting for use with our Enrolment Portal
If you have access to Excel, you can follow the step by step instructions to format the export you’ve just downloaded for use with our Enrolment Portal. Additional information regarding our Enrolment Portal can be found here.
Step 1: Insert a column between C & D, by right clicking ‘D” and using ‘Insert”
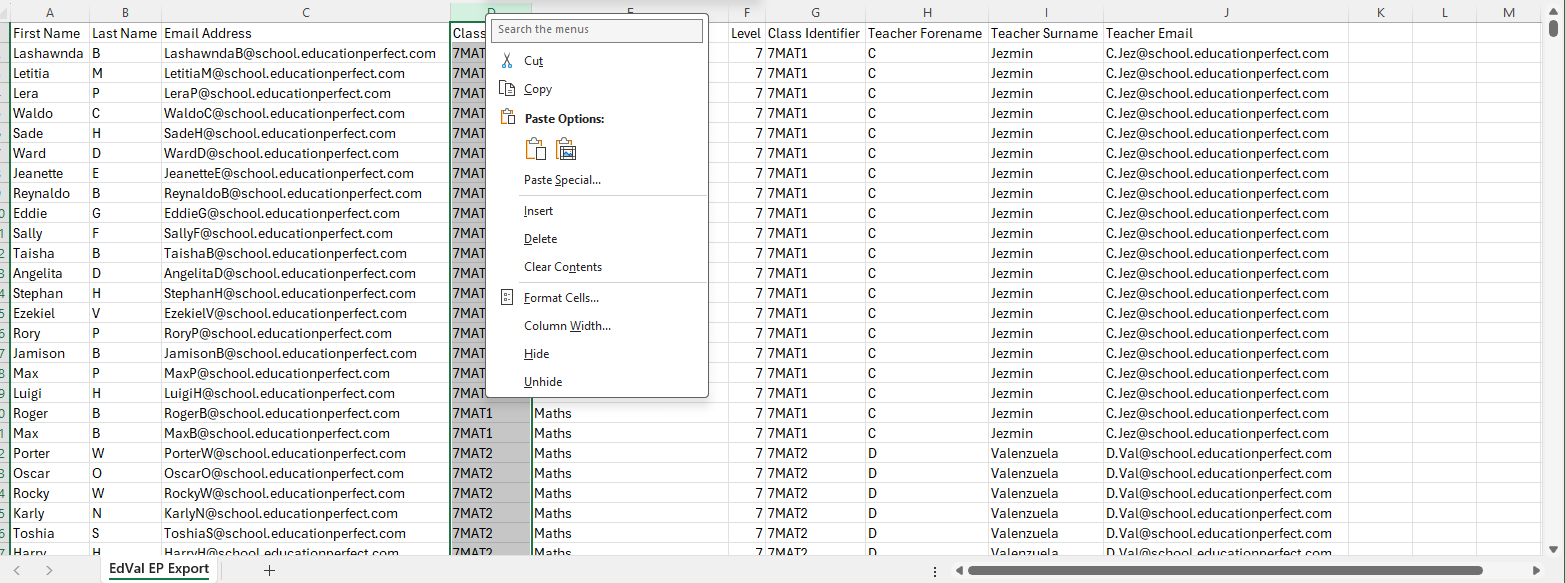
Step 2: Change the header of this column to ‘Role’, and fill with value ‘Student’
Step 3: Copy ALL data, except the first 4 columns and paste it below the existing data from Column E onwards.

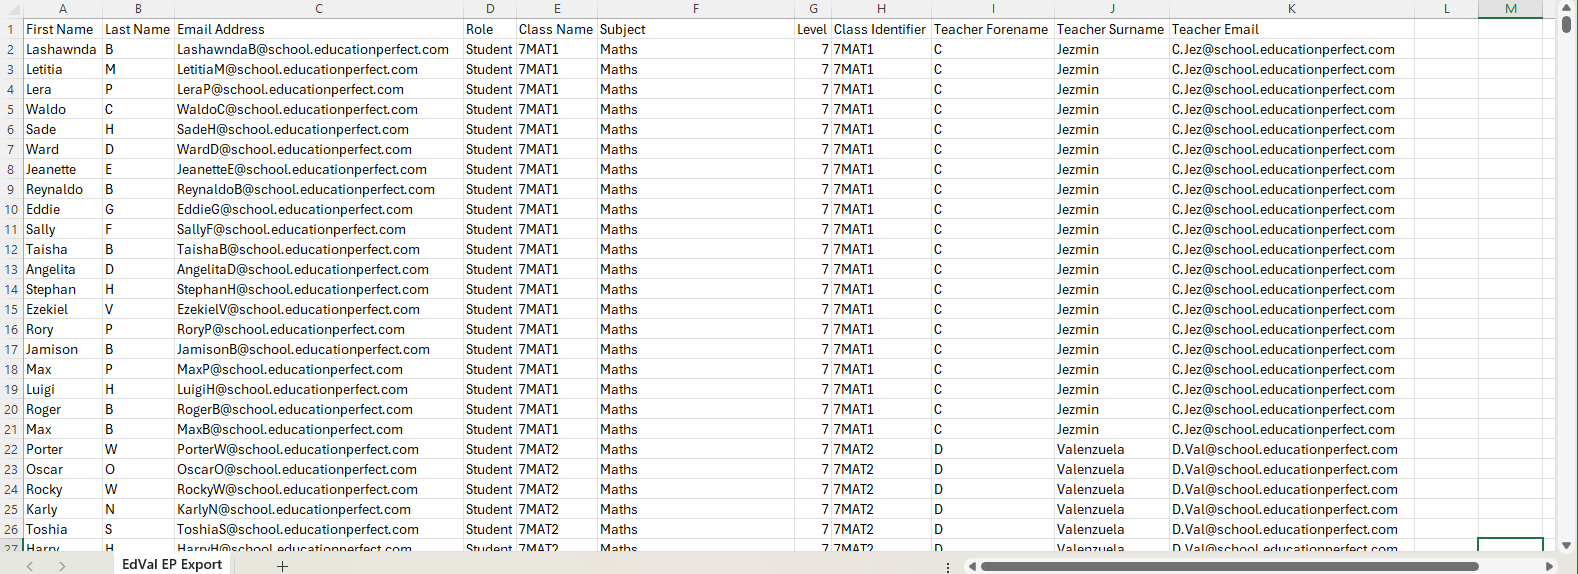
Step 5: Click on any cell that contains data, and in the ‘Data’ tab click the ‘Remove Duplicates’ function. Click OK
Step 6: Copy the teacher data at the bottom of the sheet, and paste it into the empty cells in Column A, B, and C
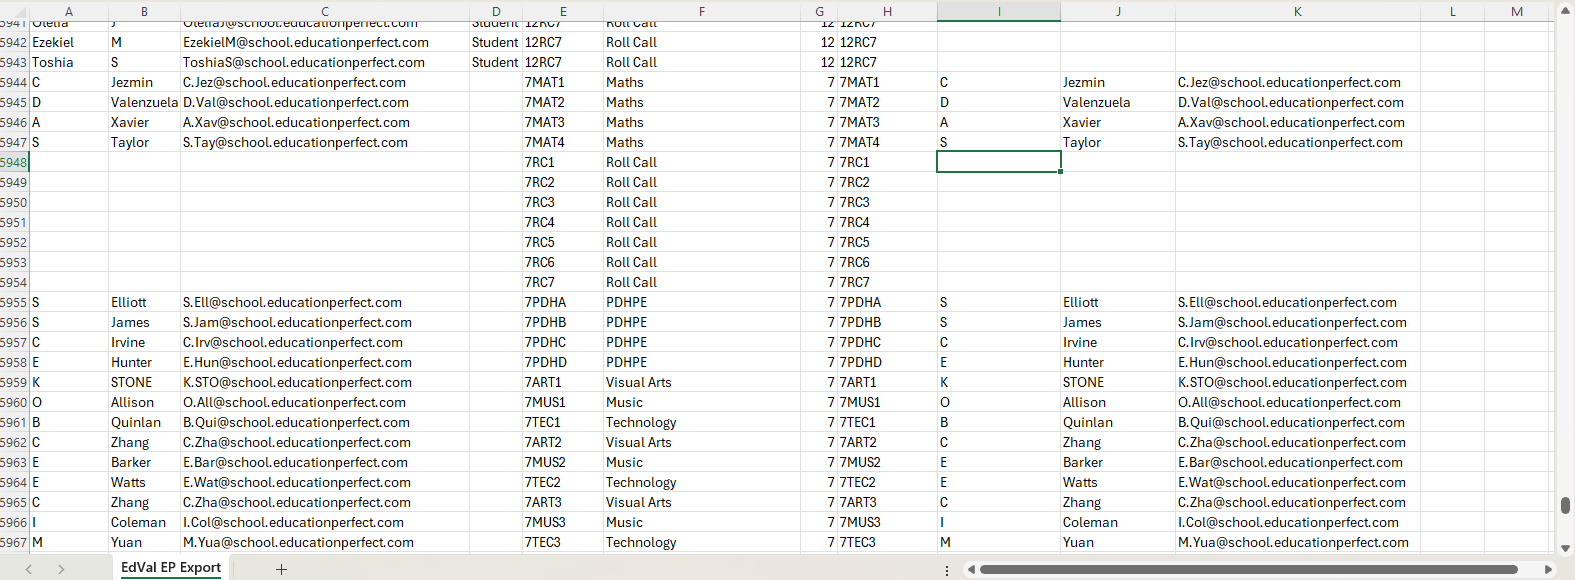
Step 7: Delete Columns I, J, and K
Step 8: Fill the rest of Column D with the value ‘Teacher’

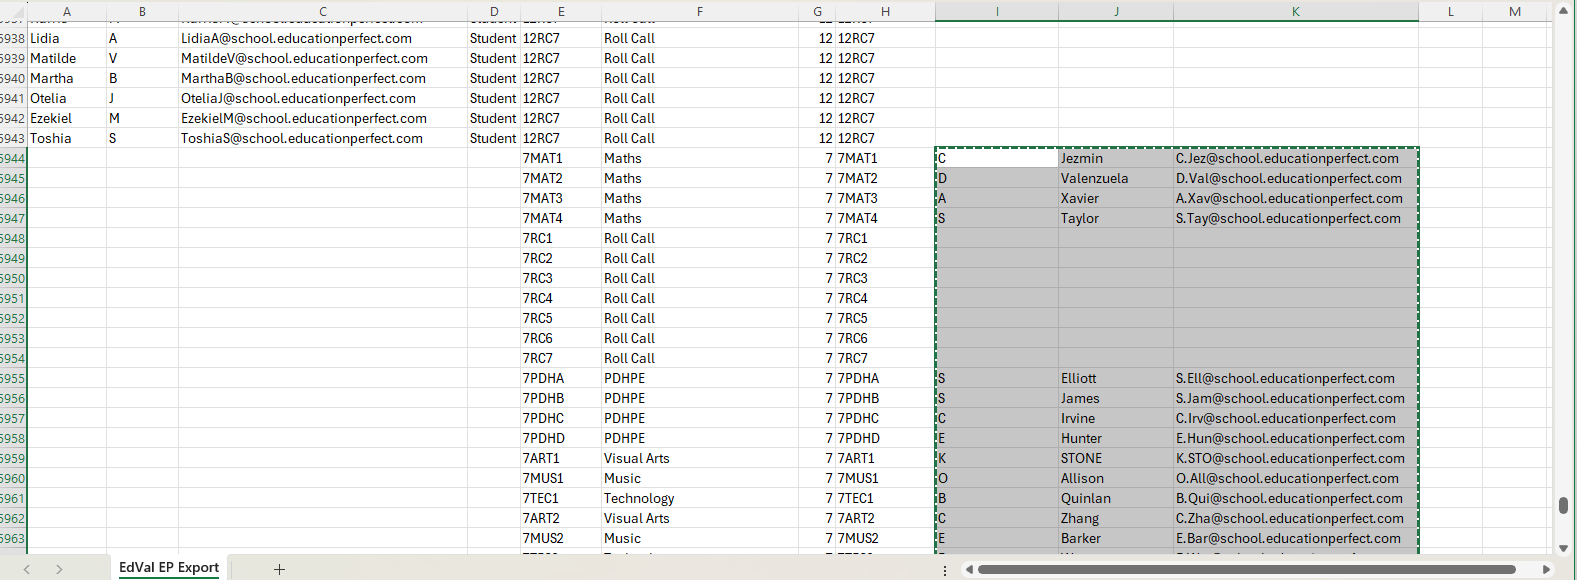
Step 9: At the top of the sheet, click on Column F and select ‘Filter’ in the Data Tab. Click the dropdown icon that appears on column F, and untick ‘Select All”
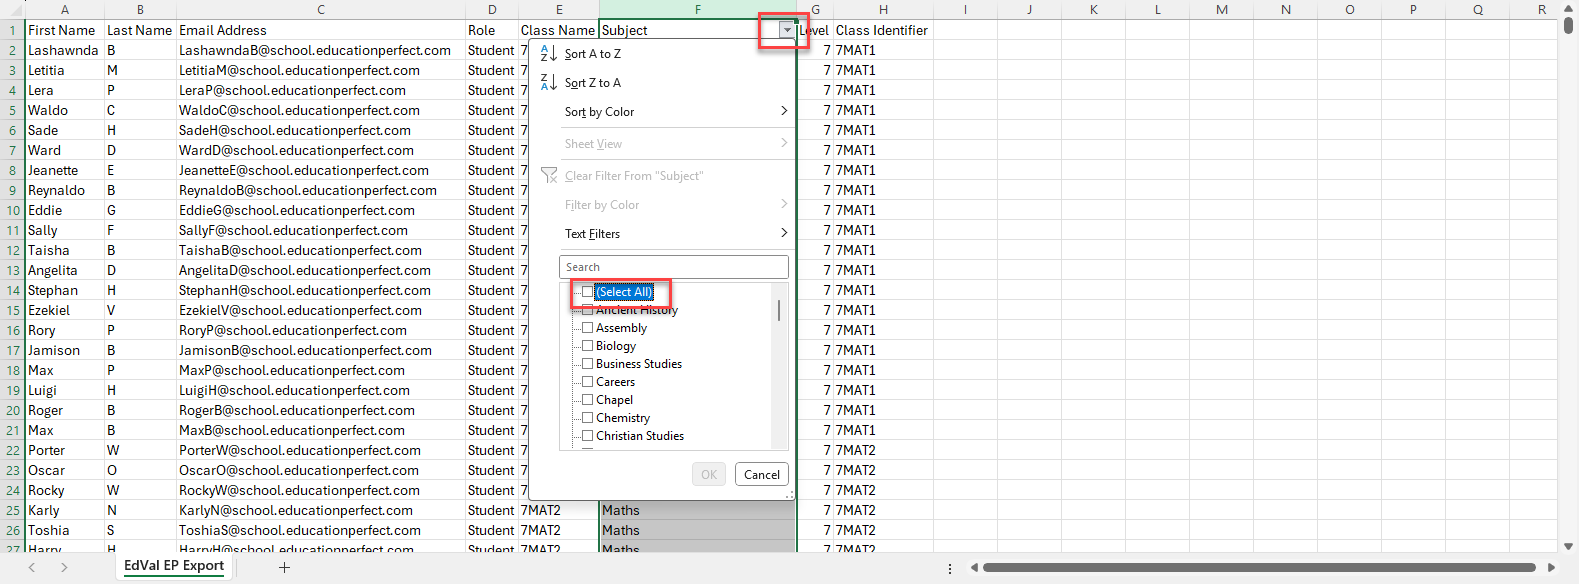
Step 10: Scroll through this filter, and select any classes that are not required on EP. For example, Assembly, Homeroom or Chapel classes. Then click ‘OK’. You can tell the filter has applied when the dropdown icon has changed to also include a funnel icon.
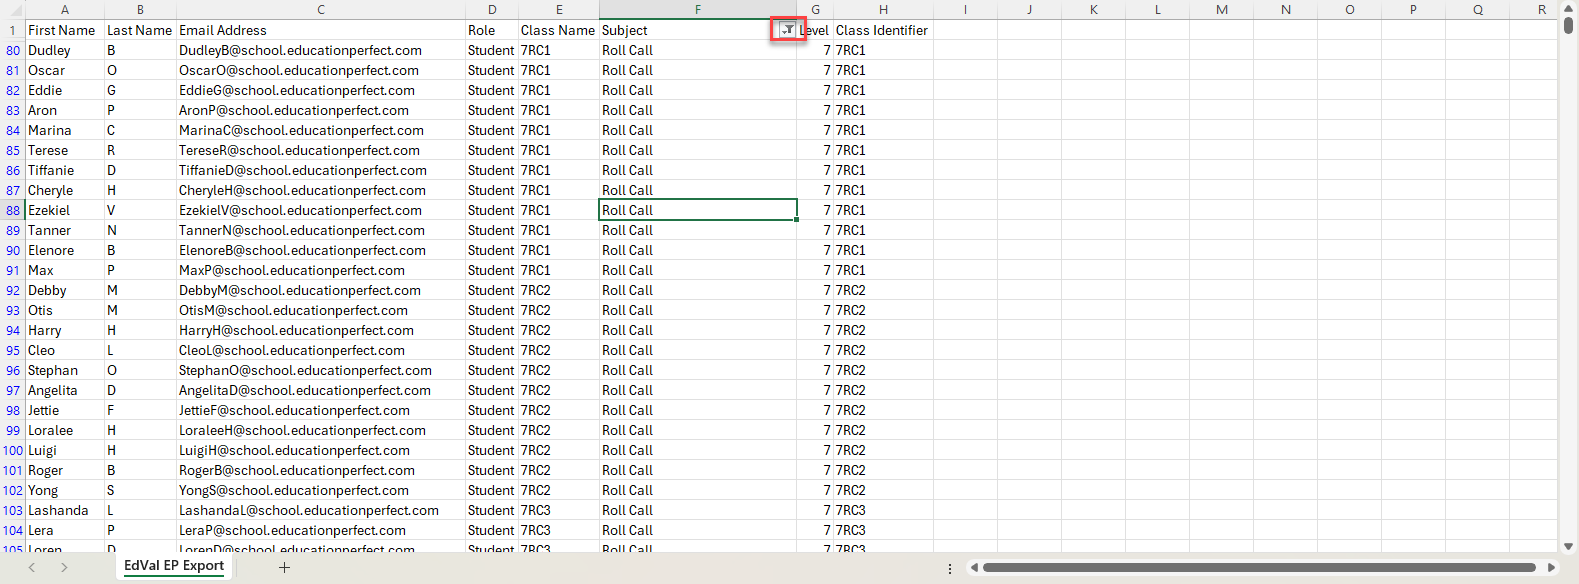
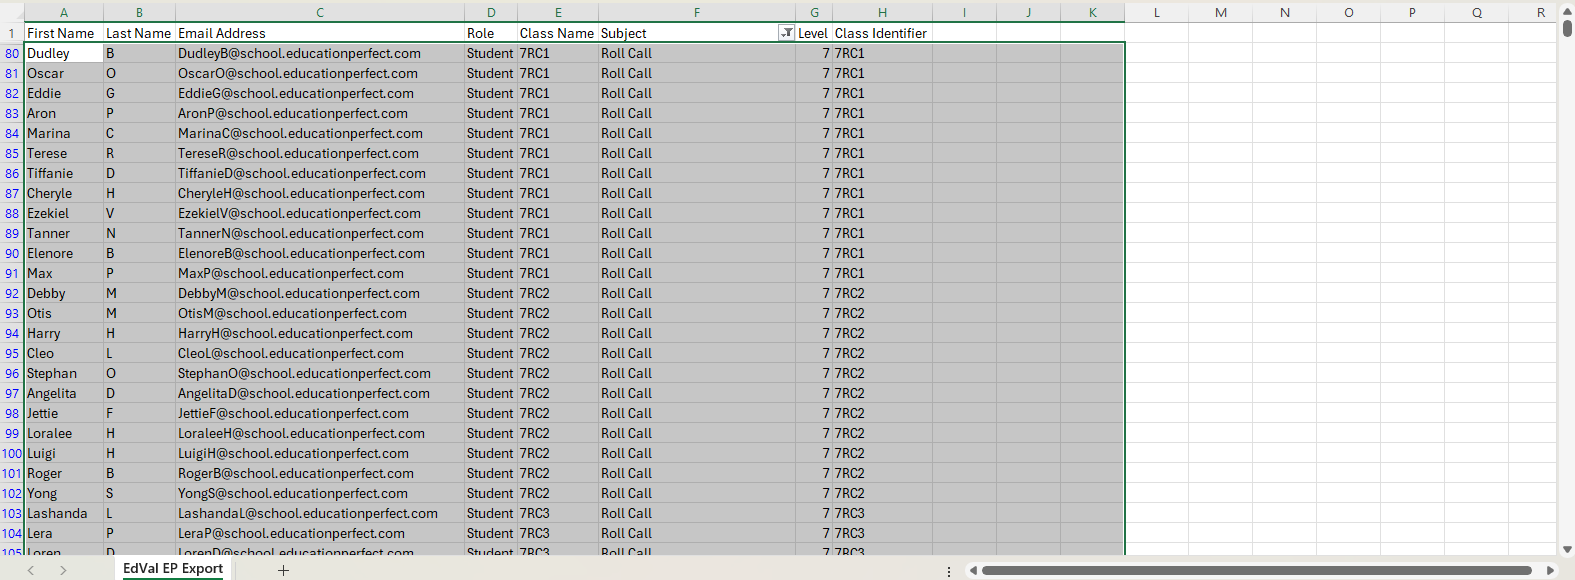
Step 11: Click on the row of the first non-header cell. In this example, that would be 80. Highlight all rows within this filter and use the command CTRL+Minus (the “-” key) to delete these rows. Then click the Filter Clear Icon in the data tab to remove the filter.

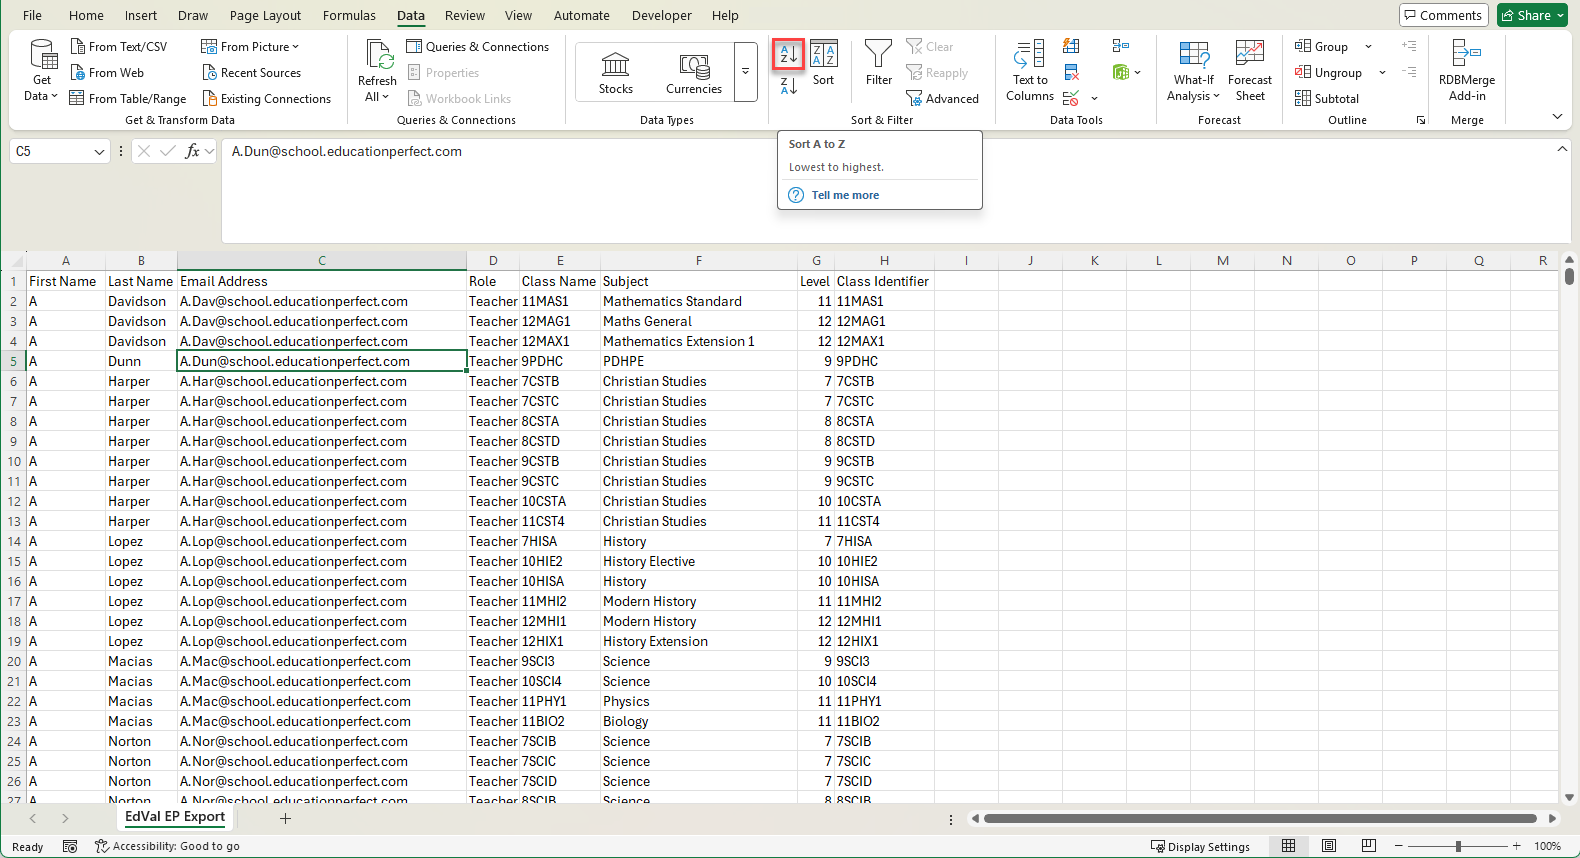
Step 12: Click on a value in the C column, and click the ‘Sort A-Z’ icon in the data tab
Step 13: Scroll to the bottom of the worksheet, and fill in or remove any students/teachers with an empty email field.
Your file should now be ready to save and upload to our Enrolment Portal. Please ensure there is only one worksheet in your file.
Use your exported files to populate one of our enrolment templates within the Enrolment Portal.
Once you populate one of our enrolment templates with your exported data and upload this to our new Enrolment Portal, you'll be able to instantly add classes, teachers and students to the platform. We recommend using our pre-created enrolment templates for the smoothest experience enrolling your teachers, students and classes.
Check out Step 2 of the guide linked above for more information on the formatting requirements of our portal.