
Setting up an integration between EP and Schoology
Adding support for Schoology is a straightforward process, which normally requires a couple of hours of work by your school's IT team/LMS manager. Education Perfect's integration may differ from other integrations your school has, because we need a way to match a Schoology user to their EP account. This enables us to include the work they do in Schoology in their learning record when teachers are writing reports and running parent/teacher interviews.
The Education Perfect + Schoology Integration Process
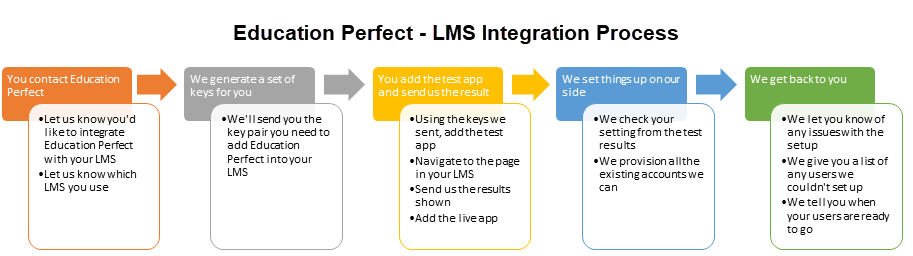
Get in touch with us
To get started, get in touch with our team. If you're not the person who will be configuring the integration, please also include them in the email so we know who to contact with next steps. Our team will send you a consumer and secret key pair which you can use to authenticate with us.
Install Education Perfect as an External Tool
To get started you'll need to add Education Perfect as an external tool within Schoology. A Schoology Administrator can add external tools for an entire school- making them available to all courses, while Schoology Teachers can only add external tools a course at a time. We have instructions for both below, but if you intend to use Education Perfect for more than one course it may save time to add us to the entire school.
Before you begin, make sure you have the pair of keys from us needed to set things up.
Adding Education Perfect as an External Tool - Full School
1. Select School Management from the Tools dropdown.

2. Select Integration from the left-hand menu.

3. Select External Tools from the top bar.
4. Click Add External Tool Provider.

5. Add the following details and click Submit.
- Tool Name: Education Perfect
- Consumer Key: Use the one we sent you
- Shared Secret: Use the one we sent you
- Privacy: Send Name and Email/Username of user who launches
- Configuration Type: Manual
- Match By: Domain
- Domain/URL: Leave blank
- Custom Parameters: Leave blank

You can now proceed to testing the integration.
Adding Education Perfect as an External Tool - Individual course
1. Select the course you are adding Education Perfect to.
 2. Go to the Course Options drop-down.
3. Select External Tool Providers.
 4. Click Add External Tool Provider and enter the following details exactly.
- Tool Name: Education Perfect
- Consumer Key: Use the one we sent you
- Shared Secret: Use the one we sent you
- Privacy: Send Name and Email/Username of user who launches
- Configuration Type: Manual
- Match By: Domain
- Domain/URL: Leave blank
- Custom Parameters: Leave blank
5. Click Submit.
You can now proceed to testing the integration.
Testing the integration
Once you have added Education Perfect as an external tool (either for the entire school or a specific course) we need to check that this is working and confirm the identifier that will be used to allow users access. We do this by adding Education Perfect to a course and checking the error message.
1. Select the course.
 2. Select Add Materials.
3. Select Add File/Link/External Tool.

4. Select External Tool.

5. Fill in the following.
- Tool Provider: Education Perfect
- Title: Test
- World wide URL:
https://sso.educationperfect.com/lti?contentUrl=https%3a%2f%2fwww.educationperfect.com%2fapp%2f%23%2f - Canada URL:
https://sso.ca.educationperfect.com/lti?contentUrl=https%3a%2f%2fwww.ca.educationperfect.com%2fapp%2f%23%2f
6. Click Submit.

7. Scroll down the page and select the item you just added.

8. If everything is set up correctly you'll see an error message like the one below. Please either copy and paste, or screenshot, the Mapped User ID Field and UserID Provided details and send them to us so we can finish setting everything up.

Matching users to their Schoology accounts
If your students have already been using Education Perfect without a Schoology integration, their EP accounts will need to be linked to the unique identifier Schoology uses to confirm their identity. This enables any work that students do on Education Perfect in Schoology to be stored against their account. Often this is the user's school email address, but it can differ from school to school - the information you send us from the error message while setting up helps us to work out exactly what to use.
If we already have the unique identifier associated with teachers' and students' accounts, for example because it's their email addresses, we'll match up everyone we can on your behalf. We will then send you a list of anyone we couldn't match. Once you send us the details for those people, we'll update them as well.
Once we've done this everything is set up - users can access content and assessments you've embedded in Schoology!
Please note that until we have completed this step, users will get an error if they attempt to access Education Perfect content embedded within Schoology.